AWS EC2の無料で利用できるインスタンスタイプで遊んでいます。
環境 : AWS
・利用サービス : AWS EC2
・インスタンスタイプ: t2.micro (無料の範囲)
・OS : Red Hat 8.3
AWSで立ち上げたインスタンスにホスト名を設定したい。設定したい名前は「websv01」としよう。
| 設定後 | 設定前 | |
| ホスト名 | websv01 | ip-172-31-1-11 |
まずは、現在のホスト名を確認。hostnameコマンドを実行する。
[ec2-user@ip-172-31-1-11 ~]$ hostname
ip-172-31-1-11.us-east-2.compute.internal
現在のホスト名は、設定したプライベートIPアドレスと、リージョン名から設定されている。
勉強用なので、このままでもいいんだけど、まぁ、せっかくだしホスト名を設定してみようかと。
前にさわった 6.4ぐらいの時は、/etc/hostsとか、/etc/network-scriptsの下のifcfgの中を書きかえて、ホスト名変更していたと思ったのだけど。。
/etc/hostsの中身は、これ。「ip-172-31-1-11」という表記がない。
[ec2-user@ip-172-31-1-11 ~]$ cat /etc/hosts
127.0.0.1   localhost localhost.localdomain localhost4 localhost4.localdomain4
::1         localhost localhost.localdomain localhost6 localhost6.localdomain6
[ec2-user@ip-172-31-1-11 ~]$ cat /etc/hostname
ip-172-31-1-11.us-east-2.compute.internal
hostnamectlコマンドを使ってホスト名を設定する。
[ec2-user@ip-172-31-1-11 ~]$ sudo hostnamectl set-hostname --static websv01
hostnamectlコマンドでかくにん。
 [ec2-user@ip-172-31-1-11 ~]$ hostnamectl
    Static hostname: websv01
 Transient hostname: ip-172-31-1-11.us-east-2.compute.internal
          Icon name: computer-vm
            Chassis: vm
         Machine ID: 23eed40f6e5642378bb4adb512206fcf
            Boot ID: 3957818a8093428c9a19aa5bfbb5c3e1
     Virtualization: xen
   Operating System: Red Hat Enterprise Linux 8.3 (Ootpa)
        CPE OS Name: cpe:/o:redhat:enterprise_linux:8.3:GA
             Kernel: Linux 4.18.0-240.1.1.el8_3.x86_64
       Architecture: x86-64
再起動
プロンプトに設定したホスト名が表示された。
[ec2-user@websv01 ~]$
hostnamectlコマンドの実行結果
[ec2-user@websv01 ~]$ hostnamectl
    Static hostname: websv01
          Icon name: computer-vm
            Chassis: vm
         Machine ID: 23eed40f6e5642378bb4adb512206fcf
            Boot ID: 812956c34ff7429fb880dbce0b9c30d2
     Virtualization: xen
   Operating System: Red Hat Enterprise Linux 8.3 (Ootpa)
        CPE OS Name: cpe:/o:redhat:enterprise_linux:8.3:GA
             Kernel: Linux 4.18.0-240.1.1.el8_3.x86_64
       Architecture: x86-64
再起動後もStatic hostnameとしてホスト名が記録されている。
Transient Hostnameがなくなったのだが、いいのだろうか。これは、別途気になる点として調べてみよう。
ホスト名設定できた。
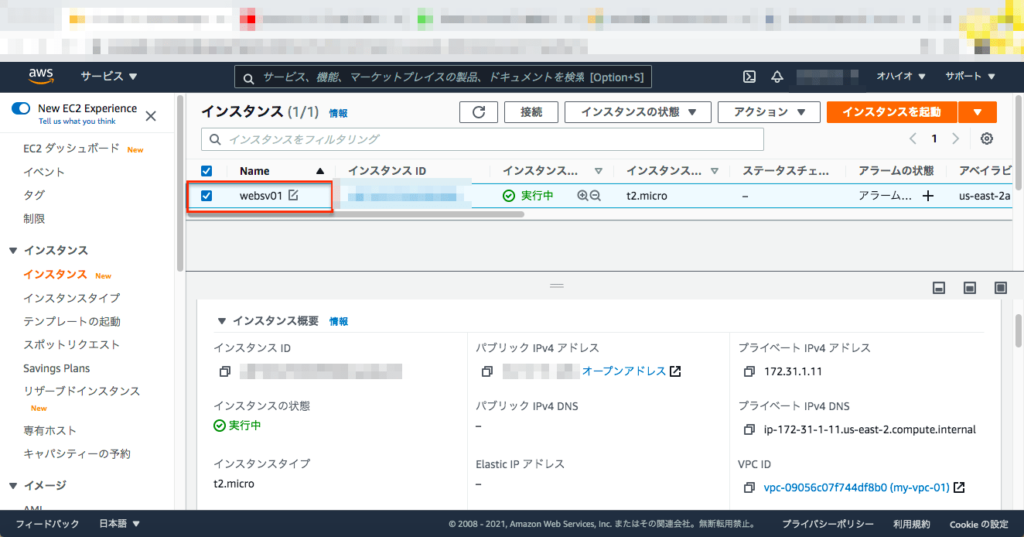
ついでにAWSコンソール上での表示名も変更しておこう。

デフォルトでは、SELINUXが有効になっている。
 [ec2-user@ip-172-31-1-11 ~]$ more /etc/selinux/config

 # This file controls the state of SELinux on the system.
 # SELINUX= can take one of these three values:
 #     enforcing - SELinux security policy is enforced.
 #     permissive - SELinux prints warnings instead of enforcing.
 #     disabled - No SELinux policy is loaded.
 SELINUX=enforcing
 # SELINUXTYPE= can take one of these three values:
 #     targeted - Targeted processes are protected,
 #     minimum - Modification of targeted policy. Only selected processes are pro
 tected.
 #     mls - Multi Level Security protection.
 SELINUXTYPE=targeted
「enforcing」を「disable」に変更して再起動する。
[ec2-user@ip-172-31-1-11 ~]$ cd /etc/selinux/
[ec2-user@ip-172-31-1-11 selinux]$ ls
config  semanage.conf  targeted

[ec2-user@ip-172-31-1-11 selinux]$ sudo cp -p config config.20210502

[ec2-user@ip-172-31-1-11 selinux]$ ll
total 12
-rw-r--r--. 1 root root  548 Oct 31  2020 config
-rw-r--r--. 1 root root  548 Oct 31  2020 config.20210502
-rw-r--r--. 1 root root 2425 Jun 29  2020 semanage.conf
drwxr-xr-x. 5 root root  133 Oct 31  2020 targeted

[ec2-user@ip-172-31-1-11 selinux]$ sudo vi config
[ec2-user@ip-172-31-1-11 selinux]$ ll
total 12
-rw-r--r--. 1 root root  547 May  2 11:44 config
-rw-r--r--. 1 root root  548 Oct 31  2020 config.20210502
-rw-r--r--. 1 root root 2425 Jun 29  2020 semanage.conf
drwxr-xr-x. 5 root root  133 Oct 31  2020 targeted

[ec2-user@ip-172-31-1-11 selinux]$ cat config

# This file controls the state of SELinux on the system.
# SELINUX= can take one of these three values:
#     enforcing - SELinux security policy is enforced.
#     permissive - SELinux prints warnings instead of enforcing.
#     disabled - No SELinux policy is loaded.
SELINUX=disabled
# SELINUXTYPE= can take one of these three values:
#     targeted - Targeted processes are protected,
#     minimum - Modification of targeted policy. Only selected processes are protected.
#     mls - Multi Level Security protection.
SELINUXTYPE=targeted


[ec2-user@ip-172-31-1-11 selinux]$ sudo reboot
Connection to 52.15.203.200 closed by remote host.
再起動後、Selinuxの状態確認。「Disabled」となっていたら意図通りの設定となっている。
[ec2-user@ip-172-31-1-11 ~]$ getenforce
Disabled
SE LINUXを無効化できました。
IPv4しか使わないので、 IPv6を無効化する。
IPv6を無効化しなくても問題はないのだが、仕事で、IPv6を無効化して作ってくれと言われることがあるので、一回やっておこうと思う。
まぁ、個人的にも無意味に ::1 でListenしているサービスが立ち上がっていると気持ち悪く感じてしまうのだが、この考えは古いのだろうか。。
前はsysctlコマンドで設定した記憶があるが、今は、nmcliコマンドでipv6無効化をするそうだ。
設定変更前、IPv6設定入っている。
[ec2-user@websv01 ~]$ ip address show
 1: lo:  mtu 65536 qdisc noqueue state UNKNOWN group default qlen 1000
     link/loopback 00:00:00:00:00:00 brd 00:00:00:00:00:00
     inet 127.0.0.1/8 scope host lo
        valid_lft forever preferred_lft forever
     inet6 ::1/128 scope host
        valid_lft forever preferred_lft forever
 2: eth0:  mtu 9001 qdisc fq_codel state UP group default qlen 1000
     link/ether 02:c8:71:77:75:7e brd ff:ff:ff:ff:ff:ff
     inet 172.31.1.11/24 brd 172.31.1.255 scope global dynamic noprefixroute eth0
        valid_lft 2267sec preferred_lft 2267sec
     inet6 fe80::c8:71ff:fe77:757e/64 scope link
        valid_lft forever preferred_lft forever
IPv6有効のため、数値は「0」。
[ec2-user@websv01 ~]$ cat /proc/sys/net/ipv6/conf/eth0/disable_ipv6
 0
設定変更
[ec2-user@websv01 ~]$ nmcli connection show
 NAME         UUID                                  TYPE      DEVICE
 System eth0  5fb06bd0-0bb0-7ffb-45f1-d6edd65f3e03  ethernet  eth0
 ens3         80caddf5-1347-4246-827e-5e0146c7f2c5  ethernet  --
[ec2-user@websv01 ~]$ sudo nmcli connection modify ens3 ipv6.method "disabled"
a
[ec2-user@websv01 ~]$ sudo nmcli connection up ens3
Error: Connection activation failed: No suitable device found for this connection (device eth0 not available because profile is not compatible with device (mismatching interface name)).
[ec2-user@websv01 ~]$ nmcli connection show
NAME         UUID                                  TYPE      DEVICE
System eth0  5fb06bd0-0bb0-7ffb-45f1-d6edd65f3e03  ethernet  eth0
ens3         80caddf5-1347-4246-827e-5e0146c7f2c5  ethernet  --

[ec2-user@websv01 ~]$ cat /proc/sys/net/ipv6/conf/eth0/disable_ipv6
0
nmcliを使ったやり方では、うまくできなかった。。。
/etc/sysctl.confにipv6無効化の設定 net.ipv6.conf.all.disable_ipv6 = 1 を追加。
[ec2-user@websv01 ~]$ more /etc/sysctl.conf
# sysctl settings are defined through files in
# /usr/lib/sysctl.d/, /run/sysctl.d/, and /etc/sysctl.d/.
#
# Vendors settings live in /usr/lib/sysctl.d/.
# To override a whole file, create a new file with the same in
# /etc/sysctl.d/ and put new settings there. To override
# only specific settings, add a file with a lexically later
# name in /etc/sysctl.d/ and put new settings there.
#
# For more information, see sysctl.conf(5) and sysctl.d(5).
net.ipv6.conf.all.disable_ipv6 = 1
設定を反映
[root@websv01 ~]# sysctl -p
net.ipv6.conf.all.disable_ipv6 = 1
設定は即時反映される。ip address showコマンドを打つと、ipv6表示されなくなった。
[root@websv01 ~]# ip address show
 1: lo:  mtu 65536 qdisc noqueue state UNKNOWN group default qlen 1000
     link/loopback 00:00:00:00:00:00 brd 00:00:00:00:00:00
     inet 127.0.0.1/8 scope host lo
        valid_lft forever preferred_lft forever
 2: eth0:  mtu 9001 qdisc fq_codel state UP group default qlen 1000
     link/ether 02:c8:71:77:75:7e brd ff:ff:ff:ff:ff:ff
     inet 172.31.1.11/24 brd 172.31.1.255 scope global dynamic noprefixroute eth0
        valid_lft 2940sec preferred_lft 2940sec
再起動後にも設定が有効か確認するためリブート。
[root@websv01 ~]# reboot
Connection to 52.15.203.200 closed by remote host.
Connection to 52.15.203.200 closed.
再起動後もipv6無効の設定が活きていて、ipv6表示はされない。
[ec2-user@websv01 ~]$ ip address show
 1: lo:  mtu 65536 qdisc noqueue state UNKNOWN group default qlen 1000
     link/loopback 00:00:00:00:00:00 brd 00:00:00:00:00:00
     inet 127.0.0.1/8 scope host lo
        valid_lft forever preferred_lft forever
 2: eth0:  mtu 9001 qdisc fq_codel state UP group default qlen 1000
     link/ether 02:c8:71:77:75:7e brd ff:ff:ff:ff:ff:ff
     inet 172.31.1.11/24 brd 172.31.1.255 scope global dynamic noprefixroute eth0
        valid_lft 3176sec preferred_lft 3176sec
ipv6の無効化できました。
$ sudo yum -y install telnet
$ sudo yum -y install bind-utils
$ sudo yum -y install sysstat
$ sudo service sysstat start
$ sudo yum -y install libmemcached
インストールはできたけど、コマンドを実行しても 「no service provided」とエラーが表示される。
また後で実行してみよう。
$ sudo yum -y install mlocate
$ sudo updatedb
